eMachineShop is not only a CAD software like any other, but it’s a lot more than that. This software is part of a major innovative business solution: eMachineShop.com, the first virtual online factory that allows companies or individuals to make their designs real in a straightforward 3-steps process. How does it work? Let’s see that.
The process of creating any 3D part that you need is pretty simple with eMachineShop. The process follows three steps to know:
1. Design: you design your desired part with all needed specifications using the eMachineShop CAD software, which is totally free, powerful, and easy to use.
2. Quote: you use the built-in tools in the CAD software to place a quote request online for the manufacturing of your designed part.
3. Order: if you are satisfied with the price, you place an order and wait for your part to be made and delivered to you.
If you are not surprised enough yet, let me say that this entire process can take as little as 15 minutes. Of course, the designing part of the process it’s on your own, but the part involving eMachineShop is extremely dynamic and fast.
One primary advantage of this system in comparison with the traditional way is that you need to buy expensive CAD software and manage to learn how to use it, while here you get the CAD tool for free, with comprehensive online tutorials available, not to mention that it’s a powerful yet easy-to-use tool.
Another important advantage is time and money. With this system you can get your part done in a fraction of the time and money you usually would spend in the traditional way.
Let’s take a few lines to explore the working process of this amazing tool:
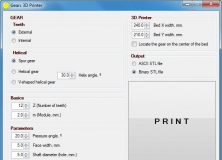
1. The first step to take while designing your part is selecting the material to use in the manufacturing process. You can view a list of materials and choose one for your part. The properties of each material are shown to help you.
2. Then, you have to draw the part you want to build, using the very intuitive tools that eMachineShops utilizes. Begin from basic shapes (lines, circles, arcs, etc.) to create your design.
3. Take a look to your part in 3D to see if it’s really what you want. If it’s not just go back to the drawing and retouch.
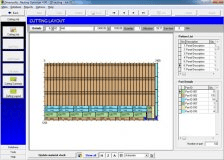
4. Now is time to get manufacturing feedback from the build in expert which will help you catch mistakes. If you are trying to make something that is impossible to machine the software's analyzer will inform you.
5. The step five is about reviewing pricing and placing an order. Fill in your address. Review the price and give the "Place Order" command. Your custom part will be fabricated and shipped to you.


Comments (2)